
Applying NailSnaps: Basic Instincts 2
Jaime GuntonThis post is about how to apply your NailSnaps to look amazing and last way longer. NailSnaps are the fastest, easiest way to get perfect custom nails. Stick ‘em on your nails, file away the excess, and you’re good to go. BUT maybe want to beyond snap ‘n go? What follows are tips and tricks to get a PERFECT application while taking care of your cuticles and fingers too.
Bonus: I’ll also cover how to deal with wrinkles, sizing, or other issues that could keep your NailSnaps from looking their best. Let’s do this!
Nail Prep
Clean, dry nails are key so start by getting rid of all the gunk (nail oils, dirt, and cuticles) that prevents the NailSnaps adhesive from sealing to your nail.
- (Optional) Apply a cuticle remover to your nails.
- At the very minimum, wash your hands and take care of concentrating the soap at your nails. If you want to get fancy (and I sometimes do), soak your fingers in a bowl of warm water and soap.

-
Push your cuticles back. I don't know about you, but I had no idea how much dead skin was on my nails until I started scraping it off with my cuticle pusher. Remember to get the sides of your nails, and keep on scraping until you no longer get any dead skin coming off. This step really helps the wrap form a seal around the edges of your nail.
If you don't have an orange stick or a cuticle pusher, you can use your fingernails. *Details on cuticle pushers below.

- (Optional) Use paper towel dipped in rubbing alcohol or nail polish remover and wipe your nails. This wipes off all your dead skin and gets rid any remaining nail oils. This step is optional, but helpful if you have naturally oily nails (ie, when you wear regular nail polish, you chip easily) I recommend using a paper towel because they are lint free, but you can also use a cotton ball or cotton pad if you're a nonconformist. Below, I'm using a tweezer and a tiny piece of paper towel because it's easier to see on camera. (You don't have to be this stingy with paper towels, but the environment will thank you.)

- (optional) Apply your favorite base coat to give NailSnaps a nice smooth, oil free surface to stick to. Again, this is optional, but if you have oilier nails, it can helps with wear and if your recovering from nail damage (like you used to be a gel addict) it can help you heal while NailSnaps cover the damage.
- (optional) Use a paper towel and rubbing alcohol to wipe your nails again. Sometimes I put on base coat, let it dry, and then lollygag around and forget what I was doing, so there could be all sorts of random stuff sitting on top of my nails. Again, you can use a cotton ball or pad if you want, you rebel.
*Cuticle pushers: I got a fancy-shmancy stainless steel cuticle pusher from Sally's for less than $3, and you can get about 100 wooden ones on Amazon for less than $3. The wooden ones are recommended because they have less potential for damaging your nail during use. Wooden ones can also pinch-hit as a dotting tool for further embellishment. (Which we'll cover in another blog post! Get excited.)
The meaty stuff: applying NailSnaps to your nails
I'm going to talk about basic application first. If you have odd sized nails, or are prone to wrinkles (which is caused by having curvalicious nails), we'll talk about that right after. But still pay attention, because even though you're special snowflakes, the basics are still important!
The Basics
FYI, NailSnaps are made of vinyl. They are sensitive to temperature. If your fingers (or the NailSnaps) are cold, you might get more wrinkles, so warm up to a normal, healthy human temperature for optimal application.
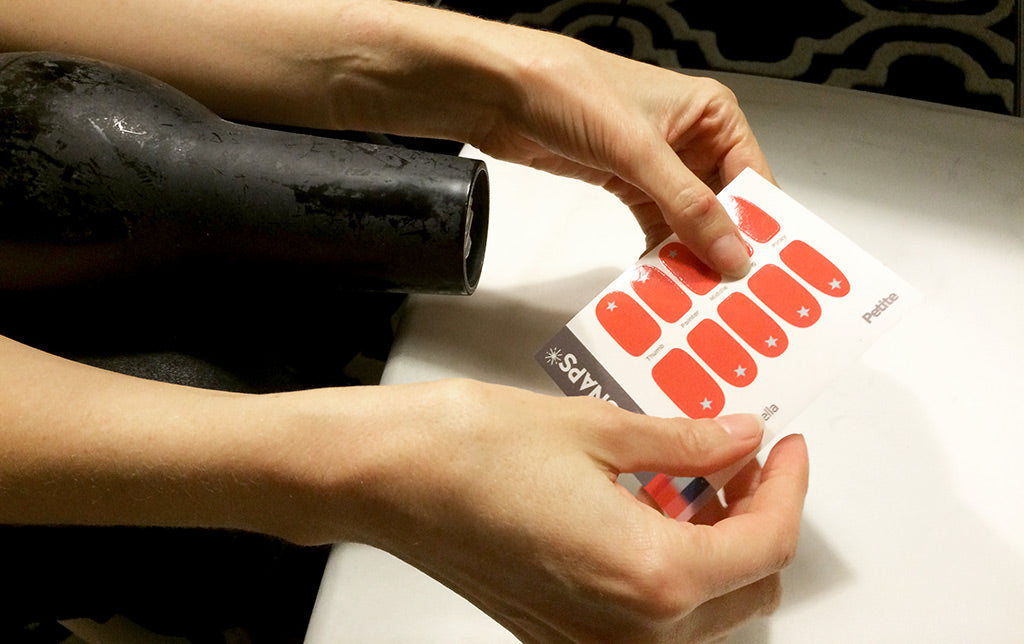
- Select the size that works best for your nail. I'm a mix between Petite and Regular, which is a nice reprieve from my being 5'8" and never considered petite. Sometimes you might have to take the nail wrap from the sheet to compare, but as long as your fingertip didn't touch the part of the nail wrap that meets your cuticle, you can put it back on the sheet and have virtually no ill effects. *IF YOU HAVE SQUARE SHAPED CUTICLES, FLIP THE NAIL WRAP AROUND AND USE THE SQUARE SIDE.
- Align the roundish edge of the wrap at, but not on your cuticle, laying it lightly on on your nail. I like to do this by very lightly dragging the wrap over my (non-oily) cuticle and letting it fall on the nail and stick there. Let go of the wrap.
And yes, that is Sailor Mercury. I couldn't help myself. Remember when the Sailor Scouts transformed and their nails got all magical and glittery? Gawd, I was always dying to get polish that would let me have that.

- Run your finger over the length of your nail. I'm going to call this the spine. Create a spine.

- Now run your fingers along the sides of your nails. (If you get wrinkles, scroll down and read below.) Do the same for the other side. Rub-a-dub dub to secure. Yay! We're almost done.

Filing
This is its own section. Because it is very important. How you file off the excess can determine the longevity of your manicure. No pressure!
- Using the coarse grain (blue side) of the included nail file, file downwards. Why? If you file side to side and saw try to saw the wrap off, dust and file grit get shoved under the wrap and ruins the adhesive so your NailSnaps wont don't stick as well. So file in one-directional strokes going downwards at a right angle to your fingernail tip. You don't have to be meticulous about this. You just want to file it enough so the excess length can be pulled away.

- Once you've filed down the wrap at the tip, just pull the excess length away. Easy peasy. If it requires too much effort, file it a bit more.

- Now, flip your file over and use the fine grain (pink side) and file again at the tip to remove any jagged edges. Again, file in downwards strokes only!
- Run the tip of one of your fingers lightly (because remember, your fingers are oily with your natural human oiliness) along the edge of your nail. If it is not completely smooth, keep filing.
- Once the edge of your nail is smooth, you're done! Enjoy your custom mani!
Top Coat
NailSnaps was designed with the busy person in mind – they're glossy right out of the box so you need topcoat. That said, I like to add it anyway because it provides a little extra gloss (unless you use a matte topcoat), and also an extra line of defense. I also like how smoooooooooooooth it is.

Basically all you have to do is apply your favorite top coat like you normally would, with the added step (unless you already do this) of capping your tips.
How do you do that? Just run the top coat brush along the edge of your nail.

What are the best top coats to use? Seche Vite is always a good standby for me. I also recently found Dr. MarVey's Flash Dry Top Coat while shopping at Bed Bath and Beyond, and I've fallen in love with it. I've been reaching for it more than my Seche Vite!
What are your favorite top coats? I'm always on the lookout for a good topcoat. If you have any in mind, comment below!
Troubleshooting
Some women experience wrinkles when using NailSnaps, and that is most likely due to the fact that their nails curve more than slightly in one or more ways, shown below.


You can tell if you have curved nails if you push two nails together and they can only touch a little - like a little kiss. I have flatter nails, and while they still curve a little bit, they like to makeout rather than give each other little pecks. You can also tell if you have curved nails if you, you know, get wrinkles when using NailSnaps.
Wrinkle Fix 1: Seam Cutting Method. (Requires topcoat)
For this method, it's best to use NailSnaps with busy, asymmetrical patterns. For this tutorial, we used a nearly solid color design so you can see more clearly.
-
Once you've got clean, dry nails, align the edge of the wrap at, but not on your cuticle and have the wrap lightly sitting on your nail (none of that spine business), instead of creating a spine, press the nail wrap on in a circular motion – starting from your cuticle, down one side, across the nail tip, and then up the other side. If you have nails that curve from cuticle to tip - pressing in a circle will force one big, intentional wrinkle towards the cuticle on the back side of your nail. The tip of your nail is the part that needs to have the tightest seal so putting the wrinkle in the back is a must.

- Force the wrinkle into a tight seam.

- File off the excess wrap. Remember to file in a downward motion, always. Use the pink side to smooth out the edges – again, in a downward motion only.
- Now that the seam is nice and tight, use a cuticle slicer or nipper** to slice or cut off the wrinkle. If it doesn't come off cleanly, go back and trim away at it. You are the boss of your wrinkle loss.

- Apply a hefty coat of topcoat to seal the seam!
**You can use either a cuticle slicer or a cuticle nipper for similar/identical results. We're using a slicer in this tutorial. Slicers come in most mani kits and are found pretty cheaply online. I got my cuticle nipper for $5 at Marshalls and you can get them pretty cheaply on Amazon. Cuticle nippers are amazing if you're prone to hangnails. If you don't have a cuticle nipper, you can try a straight edge nail clipper (which is good to have anyway, because ingrown toenails). You can also try nail scissors, but good luck with that.
Wrinkle Fix 2: Heat (The Best Way, requires a hair dryer)
Remember, NailSnaps are vinyl, so they are sensitive to temperature. This method can be very helpful for preventing wrinkles if you live in a cold climate OR you have very curved nails. Sit with a hairdryer held between your knees, facing away from you so both of your hands are free as shown in the image below:

- Starting as always with clean dry nails, place the wrap edge at, but not on your cuticle (none of that spine business, again) press the wrap to the base of the cuticle to give it a place to anchor to. You'll be using a hair dryer, so we don't want your NailSnaps blowing off into Neverland.
- Turn the hairdryer heat on. While lightly holding the excess edge of the wrap, dip your nail into the heat stream of the hairdryer. Like magic, the nail wrap will shrink wrap and curve to your fingernail! You can also use your fingers to coax the wrap down while holding your hands in the heat. This process should only take 5 seconds.

- Now fold the excess over the tip and file it away in downward strokes.
- If you see any minor wrinkles, use the hairdryer again to warm up the wrap, and beat that wrinkle into submission by pressing and rubbing it with another (warm) finger.
- Apply topcoat for extra stay, seal, and shine
Square Cuticle Fix:
I mentioned this above, but I'm going to give it more time here. If you have square cuticles, flip the wrap around and use the square side of the design at your cuticle. We very specifically designed the square end to be squoval (rounded square/square + oval) for that reason.
When you're designing NailSnaps in the mobile app, be mindful that you're going to wear NailSnaps the other way around and put the must-have parts of your design close to the square-ish edge of the hand stencil rather than the cuticle.
Too big fix:
Each set of NailSnaps includes 2 sheets in a Petite and Regular with so you can mix and match for a perfect fit. If you happen to have extremely petite nails (because you're younger or you just happen to be extra dainty), NailSnaps are easy to trim. (Look out for a future blog post about using the left over odds and ends!) Here's how to resize NailSnaps for smaller nails.
- Lightly lay the too-big wrap on your nail and create a spine (up to Step 3 of The Basics above). Depending on how much larger the NailSnap is to your nail, this will cause the sides of the NailSnap to touch the skin on the side of your nails.

- Now pat the top of the NailSnap so that it is more firmly on your nail. If the larger part of the NailSnap wasn't touching your skin before, it should be now.
- Put the blade of a cuticle nipper (or nail scissor) in the tented gap between your nail and the skin on the side of your nail.

- Cut that sucker. (I never cared for Sailor Venus much, anyway.)

- File away the excess length with downward strokes.
- Proceed with smoothing the NailSnap on your nail, filing, and adding top coat (if you want it) for extra stay, seal, and shine.

Okay gorgeous! Enjoy your long-wearing NailSnaps manis!
Next post will be a tutorial on how to create SHATTERED GLASS NAILS using NailSnaps (spoiler: It's waaaaay easier than doing it on your actual nail).
Any comments, questions, concerns? Share your favorite top/base coat and any other tips and tricks you love!