Nails
Nail Trends: Border Nails & Comic Nails
Have you guys seen border nails? Border nails are like the complete orbit nails. You can also use this technique to make cartoon style nails, which we will cover as well. You can use NailSnaps to make some pretty awesome border nails, and this is also another awesome way to get rid of NailSnaps that don’t fit!
I’m going to talk about three ways to achieve the basic border nails.
Basic Borders
Using Polish and Scissors
I prefer this way because it gives you the cleanest lines and you can use any color polish you have on hand!
- Paint your nail the color you want your border to be. Make sure the polish goes to all the edges of your nail, and cleanup with a Q-tip or toothpick if you have some flooding. Allow to dry. This layer of polish is going to be your border, so if you mess up in the middle of your nail, don’t sweat it!

- Cut your NailSnaps wraps into small oval shapes, slightly smaller than the size of your fingernail

- Apply the NailSnaps wraps to your nail, laying it in the center of the polish we painted in #1, so that the polish forms a border around your NailSnaps.

- Apply top coat!
Using Sharpies and Hair Spray
Remember the negative space tutorial? This will be very similar, but without the negative space. 😉 This way is especially good if the sizing of NailSnaps matches your nail pretty well. The only drawback is that the lines tend to not be quite as clean as the previous method.
- Using a Sharpie, outline the bottom and sides of the NailSnaps wrap so that you make a three sided border.

- Apply the NailSnaps to your fingers normally. As always, remember not to touch the adhesive too much, and always file downwards!
- Use the Sharpie to close the border at the tip of your fingernails.

- Like the negative space tutorial, very, very lightly spray your nails with hair spray. The trick to this is to spray your hand from far away. In the gif below I was a little too close because I had to film it. Spray your hand from an arm’s length away and you’ll be fine. If you get any bleeding you can use a Q-tip dipped in rubbing alcohol or remover to clean up.

- Apply a quick dry glossy top coat. Do this by having a bit more top coat on the brush and floating it over your nail, and trying to not let the brush touch the nail.

The pointer and middle finger were done with the sharpie method and the ring and pinky fingers were done with the polish method.
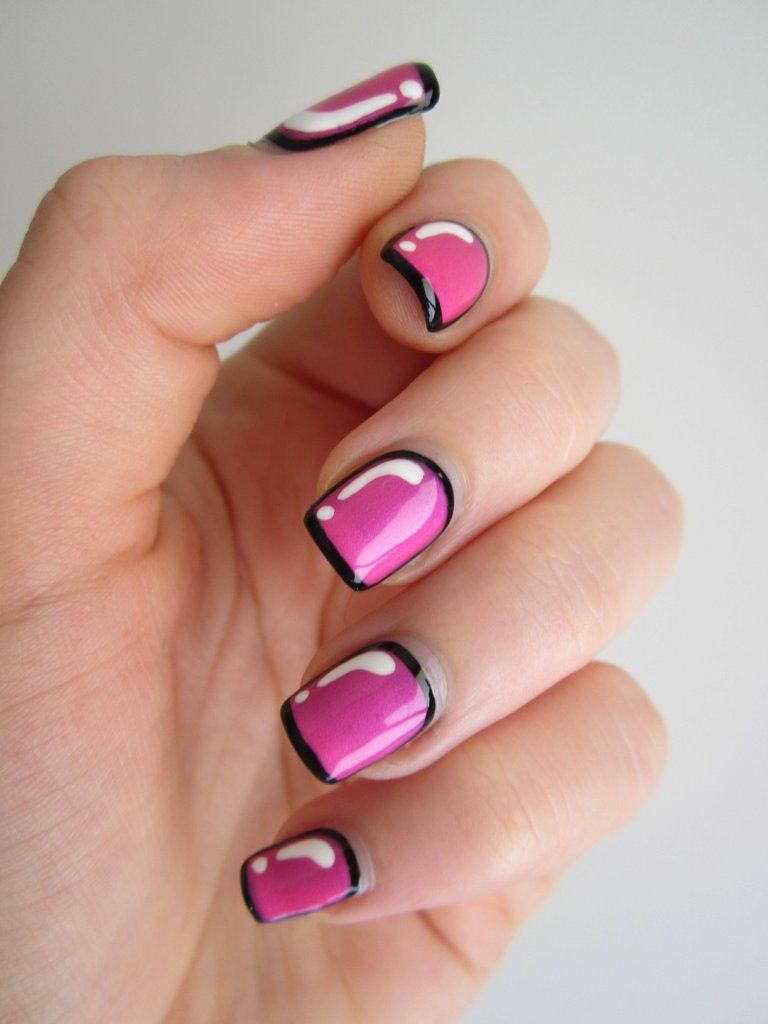
Comic Nails
Comic nails are pretty cute, and it would be good to bookmark this later if when Halloween comes around you want to be a comic book character! I think these nails may have first been popularized by cutepolish on Youtube.
You can use any of the above methods to achieve a basic border nail. For comic nails, all you need is the white shine line and some matte top coat.
You can use either of the above border tutorials for this look. I will be using the Sharpie method, so once you’ve got a border on your Nailsnaps…
- While the NailSnaps are still on their sheet, use white acrylic paint or white striper polish and paint a thin, shine-like line on the side of the nail. Add a dot at the tip of the line. It kind of looks like a ‘j.’
- Apply the NailSnaps to your fingers normally.
- Paint the remaining border at the tip of your nail (or Sharpie it in, whichever method you’re using).

- Lightly spray with hair spray and allow to dry (if you’re using the Sharpie method).
- Apply a quick dry glossy top coat. Apply this very lightly by floating the brush over your nail. Try not to let the brush touch the Sharpie. Once dry, apply a matte top coat. This is to protect the design. I’ve only ever used one kind of matte top coat and it doesn’t do a good job of protecting the design.

I hope you enjoyed this tutorial! Next week we’re going to be talking about how to achieve super bomb geometric nails! Are there any nail art trends you want to see me cover in the future? Comment below!